What’s my Homelab Setup?
When a bunch of us entered the graduate program at VMware, the SEs (System Engineer) specifically were each provided a heavy weight DELL workstation laptop which serves as a single node for us to mess around with the basics of virtualisation. That laptop was a beast and there were a lot we could do for a beginner such as setting up a mini datacenter and gaining a sense of how is it like to navigate around of virtual environment. This was something new to most of us as we all did not have much experience in the infrastructure side of things.
As we started exploring across the VMware portfolio, we realize that majority of the solutions were pretty resource intensive and having a single node simply doesn’t cut it anymore. There are several alternatives that we as VMware employees could actually take advantage off such as signing up for VMware specific courses. But I have to say one of the best learning tool that help me throughout the first year in VMware is the VMWare Hands on Lab platform. I just want to give out a big shoutout to the VMware Hands on Lab team for creating such an amazing platform which is easily accessible to ANYONE for FREE! The ability to quickly spin up a live environment where you can explore and learn about a particular solution is simply just awesome.
So… Why a Homelab?
Ok all that boring background stuff aside and back onto the main topic. After a year working in VMware I kind of wanted something more. I needed more hands on exposure and I wanted that flexibility of building and maintaining an environment on my own. I actually look at ways where I can get my hands on some enterprise grade hardware but majority were way over what my pay grade could afford. So thanks to Charles a senior and an awesome mentor of mine, offered me a deal to take over his set of NUC boxes at a discounted price. Rather then jumping straight to the big guns, I thought for a start this is a great deal and why not?
Hardware Overview
So the hardware I have are of the following:
- 2 X Intel NUC i5-7260U ( 2x SSD 256, 32GB RAM )
- 1 X Intel NUC i3-6100U ( 2 x SSD 256, 32GB RAM )
- 1 X Dell Workstation M4800 ( 2 x SSD 512, 32GB RAM, spare for now )
- 1 x 8 port 1G D-LINK unmanaged switch
If you have notice, all of the NUC boxes including the Workstation comes with 2 SSDs. This means that I’ll be able to run vSAN across the boxes as vSAN requires a minimum of 1 cache and 1 capacity disk. This reduces the need of me sourcing for an additional shared storage just so I can mess with vSphere related high availability features.
Setup Overview
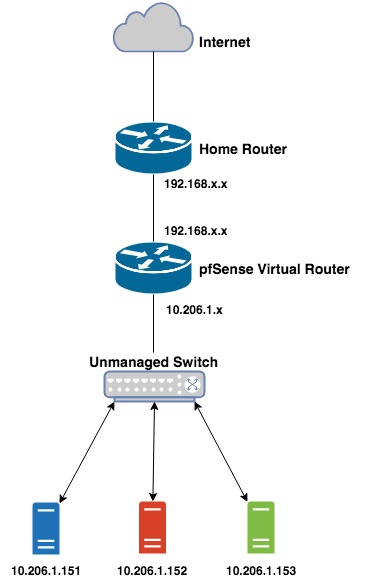
Below is a quick overview of the physical setup of my lab environment.

As I did not want to mix my personal home network environment up with my lab network environment, I decided to opt with the usage of pfSense as a virtual router. Essentially, this helps me out with getting internet connectivity within my lab environment through double NAT-ing.
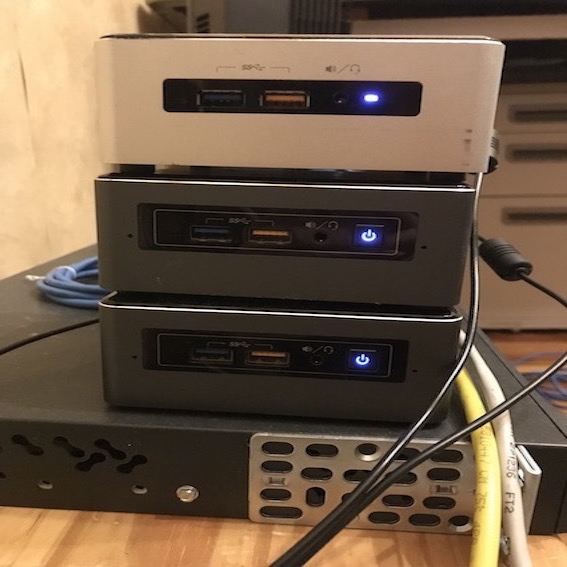
Random photos of my actual setup:

Software Overview
Essentially, these are the fundamental solutions that allows me to get a virtualize environment going.
- vCenter 6.7
- vSphere 6.7
- vSAN 6.7
- vRealize Operations 7
Future Plans & Conclusion
For a start, I’d like to leave this post focusing mainly on the physical components side of things. As part of my plan, I aim to talk more about the virtual setup and configuration of my lab. Moving forward, I’ll be using this setup as a baseline to carry out further implementation of other VMware solutions. Thou I don’t really have a crazy homelab setup, I believe theres still fairly a lot of room for me to work with. This also means that a lot of the content that I’ll be sharing is something that you as a reader can following along and its not something too far off for you to try it on your own. And of course, when opportunity arises I definitely wish to expand this lab environment but till then I shall leave it as it is and work with what I have.
