NSX-T 2.3 to 2.3.1 Upgrade Failure & Troubleshooting
2 weeks or so, I had to opportunity to help a customer out upgrading its NSX-T environment from 2.3 to 2.3.1. Apparently, this was suppose to be a straightforward and simple task as the entire process is simplified via automation. All we have to do is download the ‘NSX-T 2.3.1 Upgrade Bundle’ and upload it to the NSX Manager to let it work its magic.
Unfortunately, this upgrade process took us a good 5 - 6 solid man hours just to get it done. Along the way, we faced a couple errors in the host and controller section of the upgrade. Therefore, I would just like to take this opportunity to share some of the issues we faced and how we eventually overcome it.
I wont be going through the update process in this post as I believe there are lots of resource out there documenting the entire process down (Honestly, its not difficult at all either). As such you may refer to the following documentation/guide for some reference:
Host
The host errors were pretty straightforward. It took us awhile to realize that the host were not booting up as planned during the upgrade process.
Based on observation, the host upgrade process is as follows:
- Upgrade Host
- Put Host into Maintenance Mode
- Reboot Host
- Some final configurations before moving on to upgrade the next host or to the next step
There were 2 particular roadblocks that we faced during the upgrade.
- ‘Reboot Host’ Phase - This was not so much of a VMware issue but more so related to the physical host itself. It took us awhile to realize that the upgrade was stuck at the ‘Rebooting” stage and it wasn’t progressing due to the host not being able to boot past the BIOS page. Once we did a graceful shutdown and proceed to power on the host again, the upgrade went on as per normal.
- ‘Put Host into Maintenance mode’ Phase - We were not too sure of the issue that was preventing the host to go into maintenance mode. Since the host has been cleared out of all active VMs as part of the pre-requites of going into maintenance mode, we proceeded to reboot the host and manually triggering the maintenance mode of the host again upon restart. Thankfully, this fixed the issue and the upgrade progress as per normal.
Controller
The errors faced during the upgrading of the controller were particularly interesting.
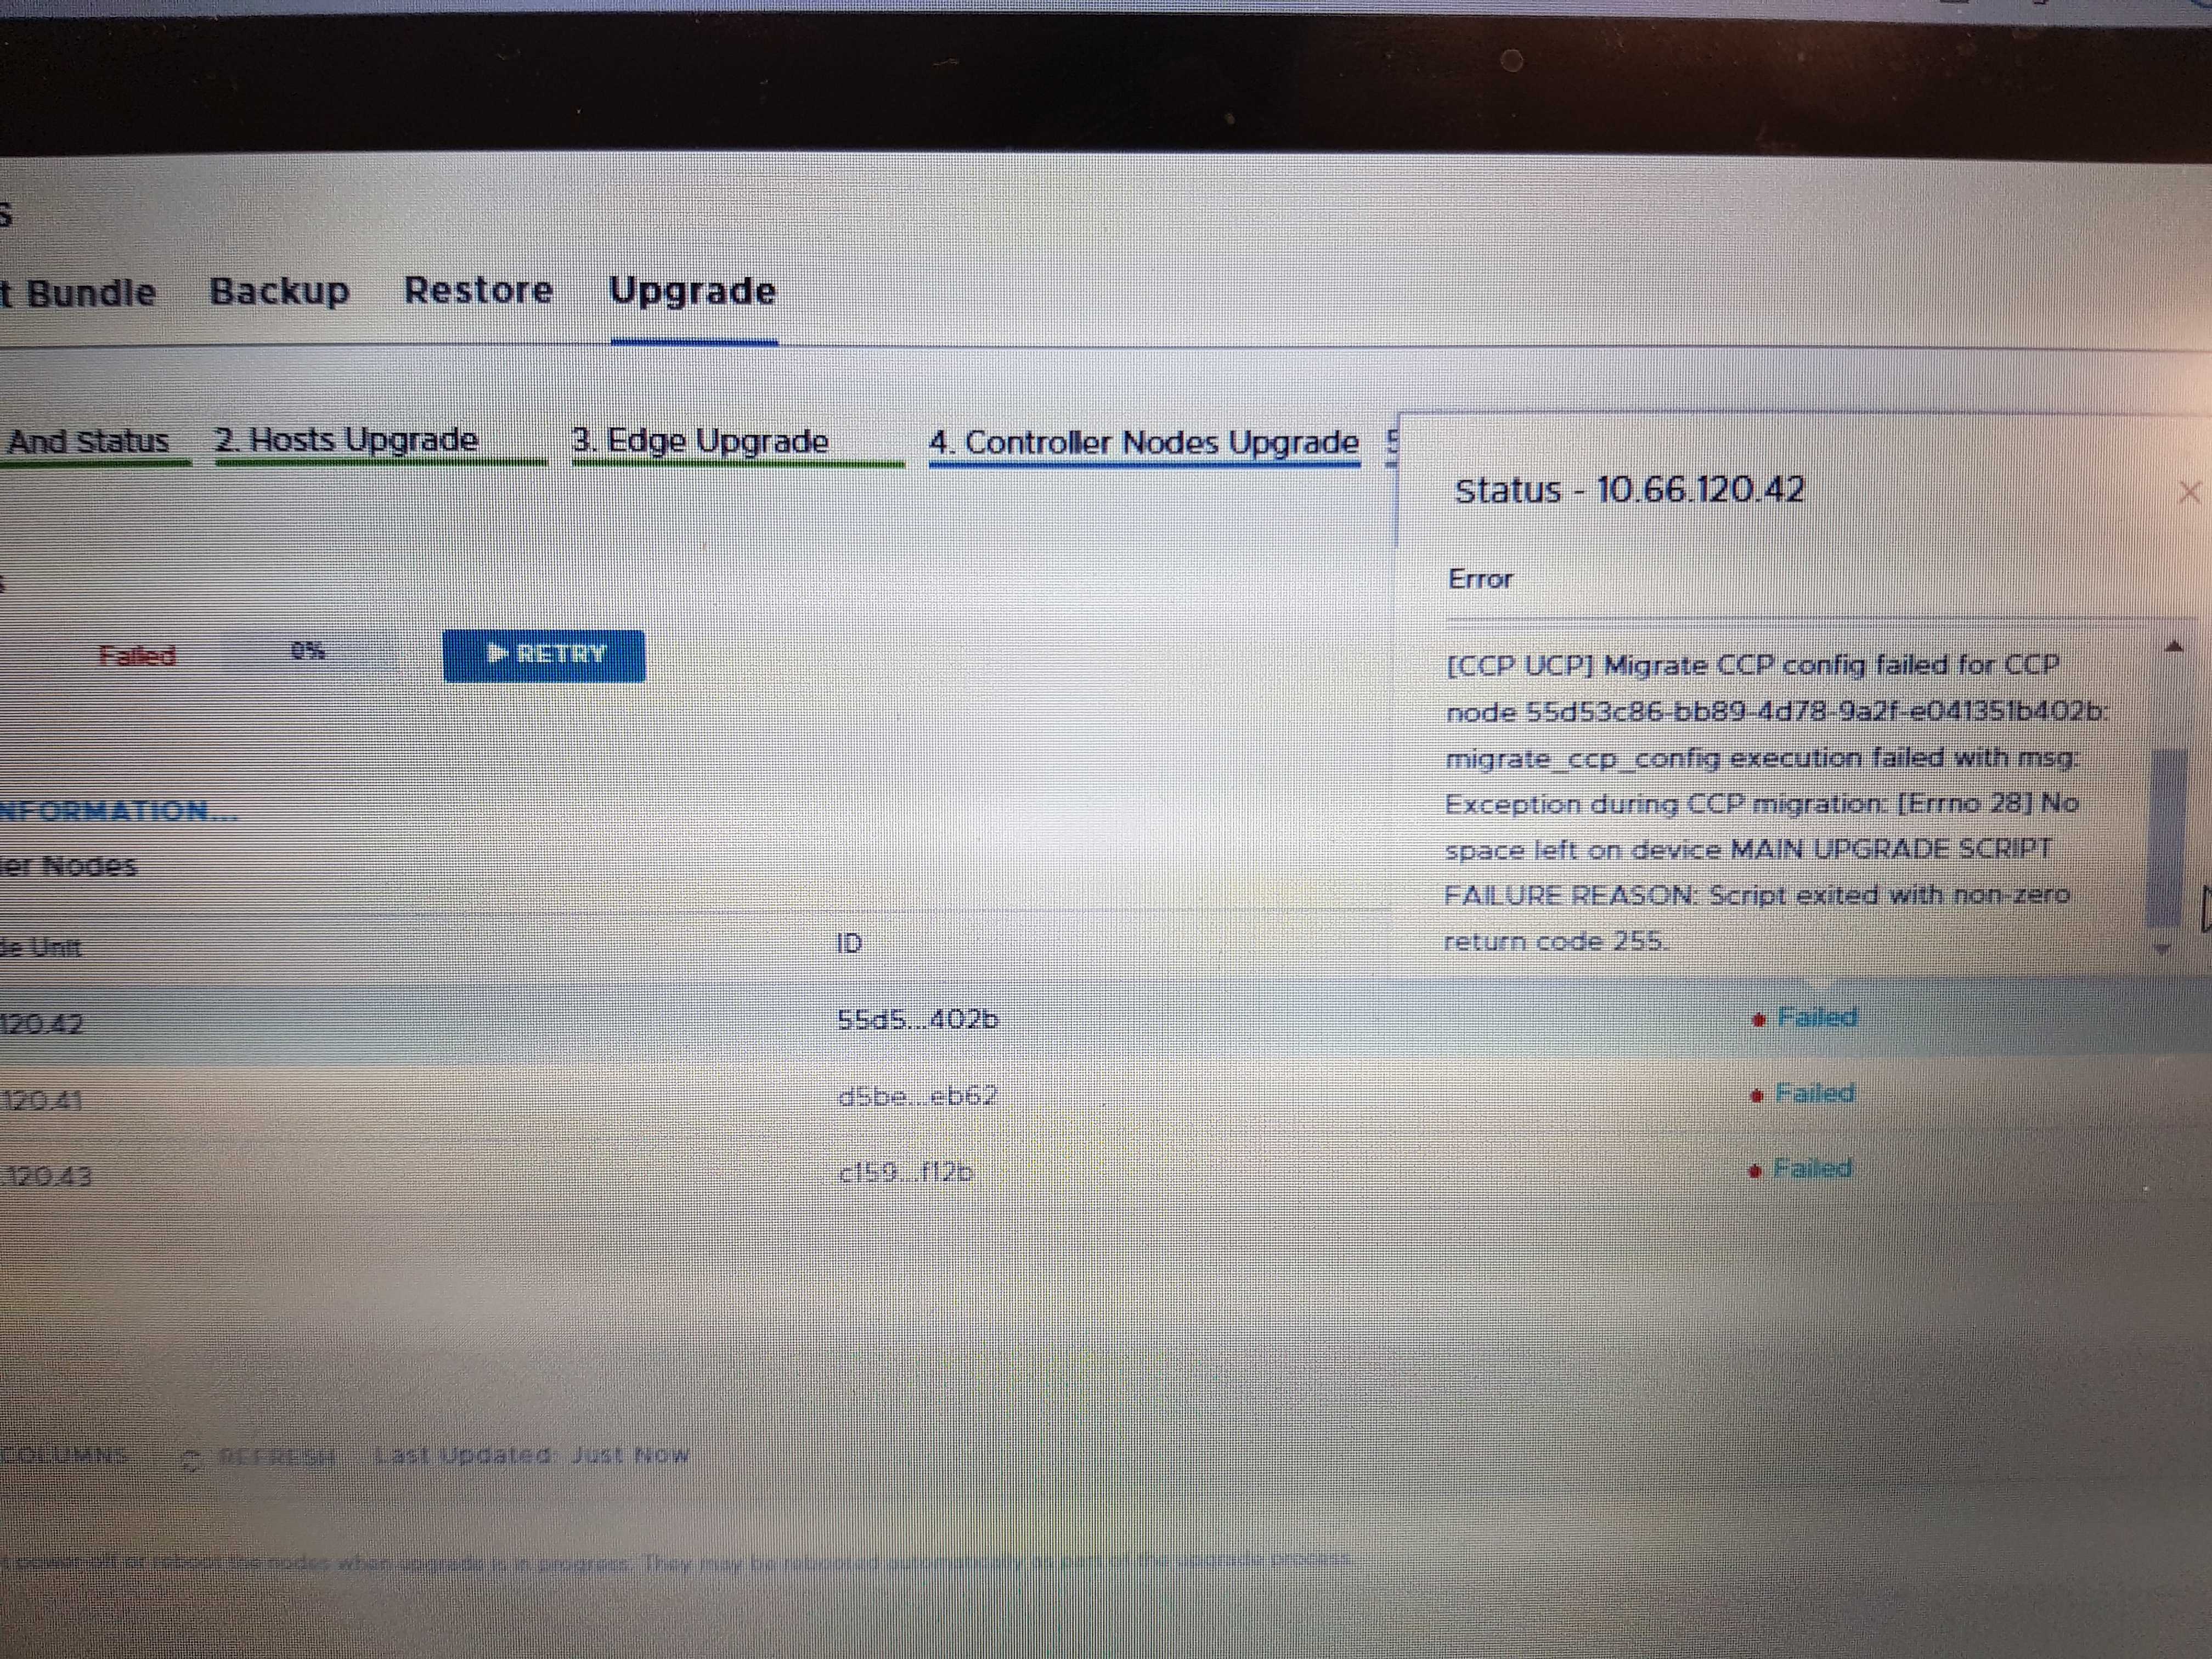
For the sake of readability, I have abstracted the error message from the above screen capture as shown below.
Error Message:
[CCP UCP] Mirate CCP config failed for CCP node <node id number> migrate_ccp_config execution failed with ms: Exeception duringg CCP migration: [Errno 28] No space left on device MAIN UPGRADE SCRIPT FAILURE REASON: Script exited with non-zero return code 255
After sourcing around for help on the following error, we decided that the only way to find out more information about the error was to remote into the controller itself.
We proceed to carry out the following:
sshinto the affected NSX-T controller- Input
st eto enter engineering mode - Run
dfcommand to list the the storage space of the the file system
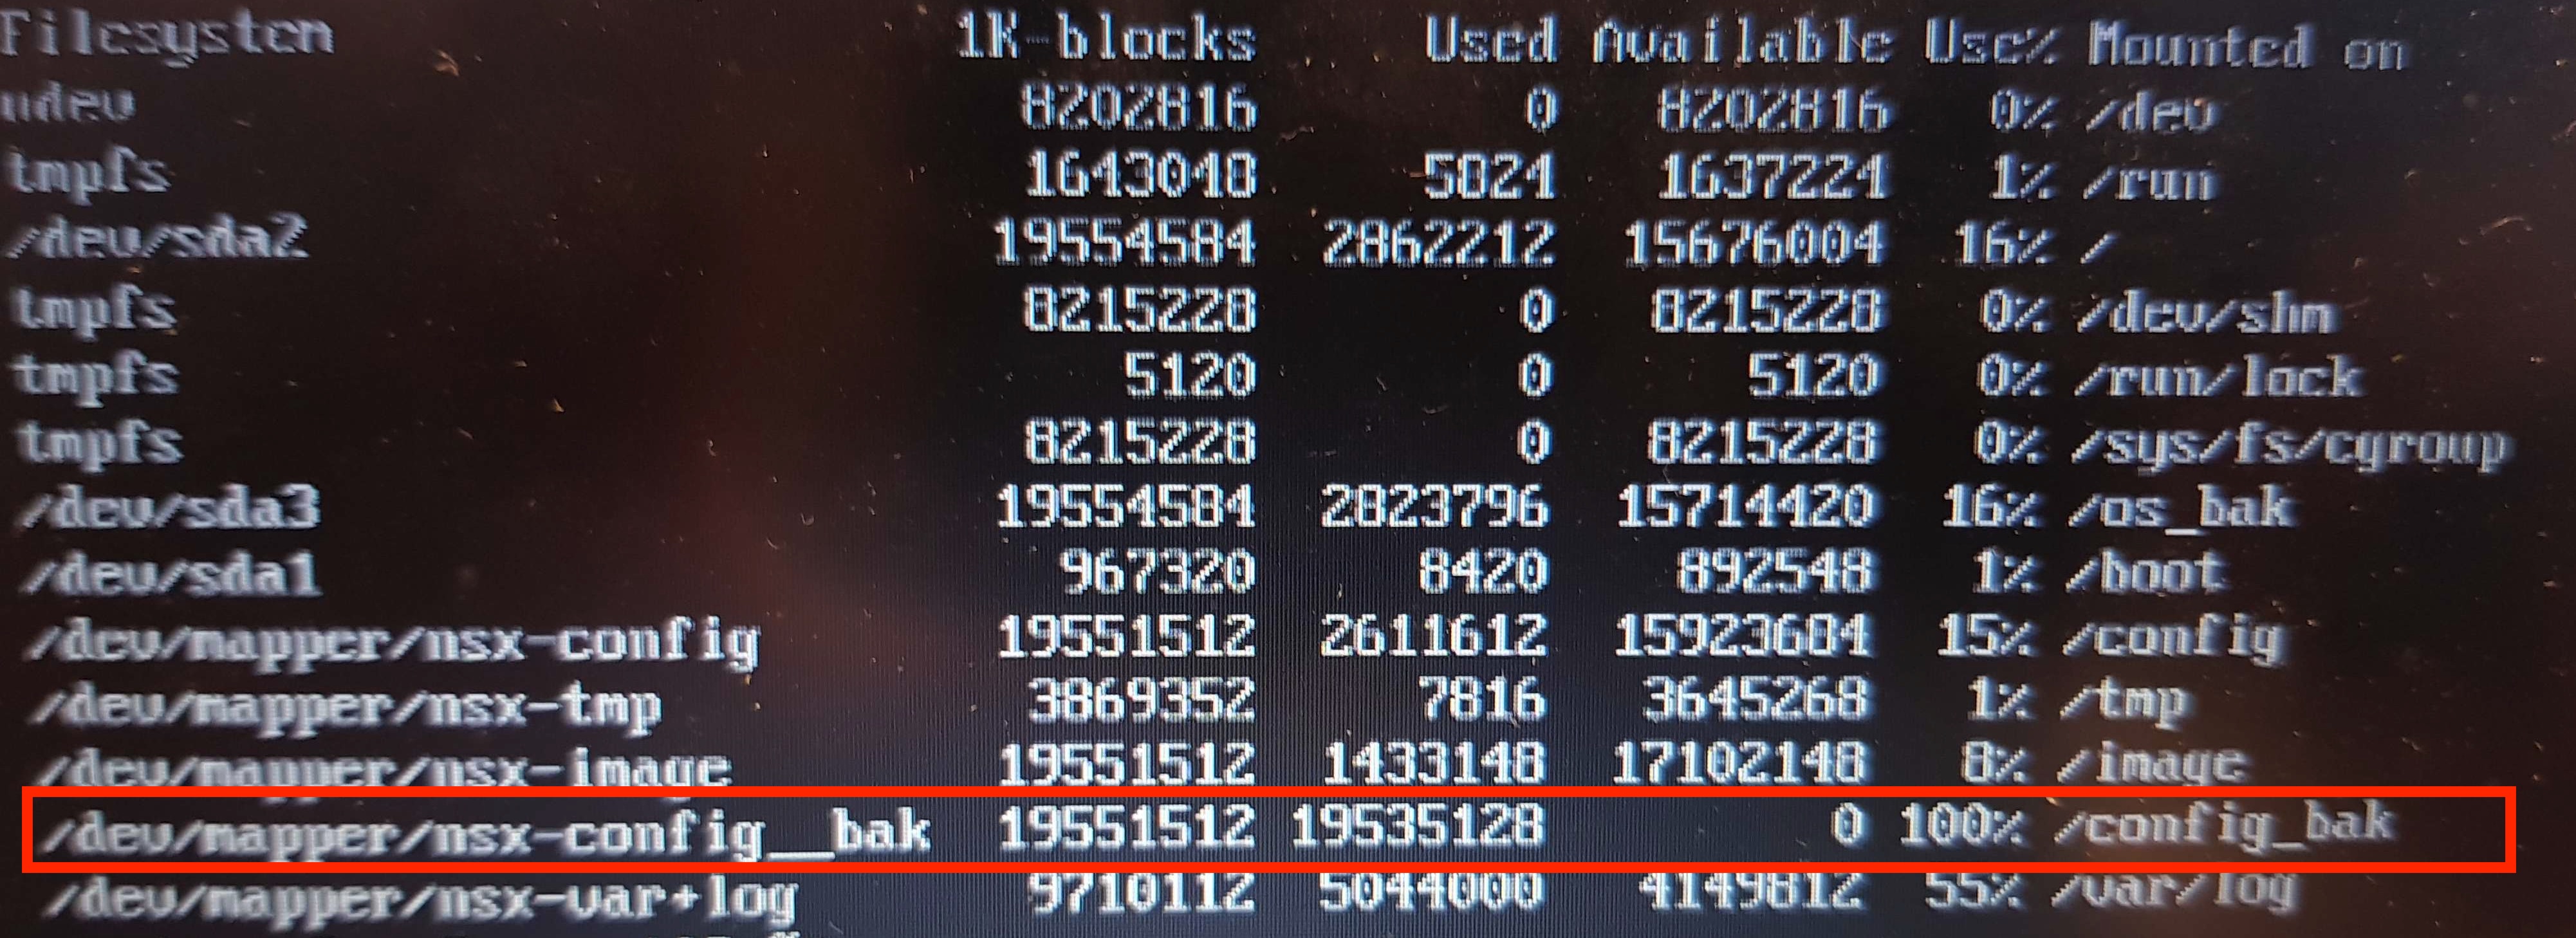
Below is an example of what you should see upon executing the commands.
NSX CLI (Manager 2.3.0.0.0.10085405). Press ? for command list or enter: help
jur01-nsxtmanager01> st e
Password:
***************************************************************************
NOTICE TO USERS

Root access should only be used when asked by VMware support team.
***************************************************************************
root@jur01-nsxtmanager01:~# df
Filesystem                  1K-blocks    Used Available Use% Mounted on
udev                          4074152       0   4074152   0% /dev
tmpfs                          817316    5636    811680   1% /run
/dev/sda2                    10695952 2938000   7191580  30% /
tmpfs                         4086560       0   4086560   0% /dev/shm
tmpfs                            5120       0      5120   0% /run/lock
tmpfs                         4086560       0   4086560   0% /sys/fs/cgroup
/dev/sda3                    10695952   26864  10102716   1% /os_bak
/dev/sda1                      967320    8420    892548   1% /boot
/dev/mapper/nsx-image        44161488   53172  41842000   1% /image
/dev/mapper/nsx-var+dump      9710112   22164   9171648   1% /var/dump
/dev/mapper/nsx-config__bak  30381000   44992  28769700   1% /config_bak
/dev/mapper/nsx-repository   32348048 4162788  26519008  14% /repository
/dev/mapper/nsx-config       30381000  107624  28707068   1% /config
/dev/mapper/nsx-tmp           3869352   12520   3640564   1% /tmp
/dev/mapper/nsx-var+log      28143484 6623156  20178576  25% /var/log
If we take a look at the screen capture below, we found out that the output of the customer’s environment is slightly different from what we aspect. We notice that the /dev/mapper/nsx-config__bak folder is at 100% utilization and this immediately was a red flag to us.
Next, we decided to further trace the source of the exact content that was eating up the space by doing the following:
- Run
du -sh /config_bak/*to list the folders within/config_bakto identify which folder is actually eating up the space. - Repeat this process by adding another level of folder each time till the source has been identified.
- The final folder structure of the
du -shcommand that we have identified is as such:du -sh /config_bak/moot-server/localServiceManager/containers/Zookeeper/persistentStore/zkWorkspace/version-2/
The verdict was that there was a mixture of logs and snapshots stored under the /config_bak folder that belongs to the internal Zookeeper instance which was taking up all the space.
To fix this, we ran the following commands to delete any files that is related to logs or snapshots that are more than 7 days in order to free up space.
 find /config_bak/moot-server/localServiceManager/containers/Zookeeper/persistentStore/zkWorkspace/version-2/log* -mtime +30 -exec rm -f {} \;
 find /config_bak/moot-server/localServiceManager/containers/Zookeeper/persistentStore/zkWorkspace/version-2/snapshot.* -mtime +30 -exec rm -f {} \;
There you have it, run the upgrade process on the controller again and the process should carry out as per normal.